Sunday, July 15, 2012

It's that time again....time for a Ribbon Assortment.  Have you seen the new Ribbon that Stampin' Up! has to offer in their new 2012-2013 Idea Book & Catalogue?!?  You will find it on pages 172 and 173 in the new 2012-2013 Idea Book and Catalogue.  I adore the title on that page..."Swirl and Curl for a fabulous finish".  Too cute!  For full details about My Amazing Ribbon Assortment click on the My Specials! page.


Happy Stamping!
Michelle B
Independent Stampin' Up! Demonstrator
inspire. create. share.

RMHC Moving Forward


This stamp image is part of Stampin' Up!'s Ronald McDonald House Charities (RMHC)  You will find this image along with 7 others on page 209 of the Idea Book & Catalogue.  When you purchase this stamp set Stampin' Up! donates time and money ($3.00 US) to support RMHC.  A stamp set that helps charity is just my kind of stamp set. 

I made this card for a friend of mine and surprised her by mailing it to her.  :)

Stampin' Up! supplies used:
Stamp Set: Moving Forward
Paper: Whisper White card stock, Primrose Petals card stock (2012-2014 in-color)
Ink: Primrose Petals Stampin' Write Marker (2012-2014 in-color), Summer Starfruit Stampin' Write Marker (2012-2014 in-color), Gumball Green Stampin' Write Marker (2012-2014 in-color), Early Espresso Stampin' Write Marker
Accessories:  Stampin' Dimensionals, Big Shot Die-Cut Machine, Bitty Banners Framelits, Pearl Basic Jewels

Happy Stamping!
Michelle B
Independent Stampin' Up! Demonstrator
inspire. create. share.

Monday, July 9, 2012

Embellished Events Birthday Card

I hope all of you are doing well and enjoying the beautiful warm weather we have been having.  I think the temperature reached 34 degrees today.....thank goodness for cool basements with stamping supplies!

Here is a card I made with a brand new stamp set out of the new 2012-2013 Idea Book & Catalogue.  It is called Embellished Events.  You can find this stamp set on page 40.  This stamp set is right up my alley as it is filled with bold image crisp images.  As you probably already know that bold images is what I use most but perhaps I may need to expand my stamping horizons by also using some detailed stamp sets.  My wishlist keeps on growing every time I open up the new 2012-2013 Idea Book & Catalogue.

This card also features Stampin' Up!'s new 2012-2014 In-Colors....Summer Starfruit, Raspberry Ripple and Primrose Petals.

If you look really closely at the candles you will see I added some Dazzling Details to give them some sparkle.  I also added Pearl Basic Jewels on the Raspbery Ripple layer of the cake.  I love the variety of different Stampin' Up! accessories.


Stampin Up! Supplies used:

Stamp Set: Embellished Events
Paper: Crumb Cake card stock, Summer Starfruit card stock, Raspberry Ripple card stock, Early Espresso card stock, Whisper White card stock, Primrose Petals card stock
Ink: Summer Starfruit Stampin' Write Marker, Primrose Petals Stampin' Write Marker, Early Espresso Stampin' Write Marker, Raspberry Ripple Stampin' Write Marker
Accessories: Big Shot Die-Cut Machine, Perfect Polka Dots Textured Embossing Folder, Stampin' Dimensionals, Scallop Edge Border Punch, Dazzling Details, Pearl Basic Jewels, Brights Designer Buttons

Happy Stamping!
Michelle B
Independent Stampin' Up! Demonstrator
inspire. create. share.

Saturday, June 23, 2012

In-Colors Betsy's Blossoms Card

The new 2012-2014 In-Colors are quickly becoming my favs.  The Gumball Green color is very similar to Wild Wasabi it is just a couple of shades lighter and the Summer Starfruit is a bit darker than Daffodil Delight.  I also like the deep color of Raspberry Ripple and the bright rich color of Primrose Petals.  If you don't have these new in-colors already you should definetly add them to your wishlist.    You will see the words on both cards have little frames around them and were cut out into a banner type shape.  The stamp set for the words is called Itty Bitty Banners and it has a matching Big Shot product...........Bitty Banners Framelits.  I have never used Framelits before and can also tell you that these products (stamp set and framelits) will soon be a fav of mine.  With all of these new catalogue products I think I may just have to have a STAMP CAMP.  Check back soon for details......


Thank you Card
Stamp Set:  Betsy's Blossoms, Itty Bitty Banners
Paper: Raspberry Ripple card stock, Gumball Green card stock, Whisper White card stock
Ink: Raspberry Ripple Classic Stampin' Pad, Summer Starfruit Classic Stampin' Pad, Gumball Green Classic Stampin' Pad
Accessories: Big Shot Die-Cut Machine, Bitty Banner Framelits, Stampin' Dimensionals, Pearl Basic Jewels

For You Card
Stamp Set: Betsy's Blossoms, Itty Bitty Banners

Paper: Raspberry Ripple card stock, Gumball Green card stock, Whisper White card stock
Ink: Raspberry Ripple Classic Stampin' Pad, Summer Starfruit Classic Stampin' Pad, Gumball Green Classic Stampin' Pad
Accessories: Big Shot Die-Cut Machine, Bitty Banner Framelits, Stampin' Dimensionals, Pearl Basic Jewels

Happy Stamping!

Michelle B.
Independent Stampin' Up! Demonstrator
Inspire. Create. Share.

Monday, June 18, 2012

Betsy's Blossoms stamp set + 2012-2014 In Colors


Here is what you get when you create cards using the new Betsy's Blossoms stamp set (found on page 72 of the new 2012-2013 Idea Book & Catalogue) and 2012-2014 In Colors (found on page 150 of the new Idea Book & Catalogue).  This stamp set is so much fun to create with.  Look at the nice bold crisp images and details too.  And the new In Colors are so fresh and bright.  I especially like the Gumball Green and Primrose Petals colors.  I created these cards just the other night.  I made a bunch of them so that I could send them out to my family and friend "just because".  I hope they like them!  The bird image was stamped on Whisper White card stock and then cut out and raised with Stampin' Dimensionals on the leaft image.  I also stamped an extra image and cut out the bird's front wing and placed a Stampin' Dimensional under that too.  The Stampin' Dimensionals really give the bird a 3-D look.  I think I just may make some more to keep on hand.  I like the color combo and layout of the images on the card.  The card below just has the words "thinking of you" stamped on the inside.


Stampin' Up! Supplies used:
Stamp Set: Betsy's Blossoms, Petit Pairs, Teeny Tiny Wishes (Thinkin of you - sentiment)
Paper: Pink Pirouette card stock, Whisper White card stock, Early Espresso card stock
Ink: Early Espresso Classic Stampin' Pad, Primrose Petals Classic Stampin' Pad, Gumball Green Classic Stampin' Pad, Summer Starfruit Classic Stampin' Pad
Accessories: Basic Pearls, Itty Bitty Shapes Punch Pack, Stampin' Dimensionals, Scallop Edge Border Punch

Happy Stamping!
Michelle B
inspire. create. share.

Wednesday, June 6, 2012

Hamburger.....anyone????


One of the ideas I have been comtemplating is organizing a block party & bbq.  I have the flyer made and thought that I needed a little something extra to get people excited to come and to help that them not forget.  I had an idea to make a magnet to hand out when I go door to door handing out the flyers.  On the magnet the details of the block party & bbq (date and time) will be displayed.  Now I just needed a cute little "bbq" themed item to place on my magnet.  I searched SCS (http://www.splitcoaststampers.com/) as well as the Stampin' Connection (exclusive website for SU Demos) and found many hamburgers created with SU punches from some very talented stampers.  Here is the one I created.  :)  This too cute little hamburger is going to be placed just above the date and time of the block party & bbq.  I sure hope my neighbours like my idea of this magnet to remind them of the upcoming block party & bbq.  I will be sure to keep ya' posted.

Stampin' Up! products used:
Paper:  Crumb Cake card stock, Chocolate Chip card stock, Garden Green card stock, Peach Parfait card stock, Poppy Parade card stock
Ink: Chocolate Chip Stampin' Write Marker
Punches:
Extra-Large Oval Punch: Crumb Cake card stock for top of hamburger bun
Word Window Punch: Crumb Cake card stock for bottom of hamburger bun
Modern Label Punch: Chocolate Chip card stock for hamburger pattie
Scallop Cricle Punch: Garden Green card stock for lettuce
Photo Corner Punch: Peach Parfait card stock for cheese (you could always use vanilla for mozza cheese)
1-1/4" Circle Punch: Poppy Parade card stock for tomato

Step by Step Instruction:
Start making the hamburger from the bottom up.  Before gluing anything together I would put the pieces in place first.
1. Place the Crumb Cake bottom of the hamburger bun (Word Window Punch) on a piece of card stock.
2. Next take the Chocolate Chip hamburger pattie (Modern Label Punch) and place just above the bottom of the hamburger bun.
3. Next take the Garden Green lettuce (Scallop Circle Punch) over top of hamburger pattie and bottom of hamburger bun. (You can always cut the lettuce in half if the full size it too big.)
4. Next take the Peach Parfait cheese (Photo Corner Punch) and place over top of the lettuce on the left side of the hamburger.
5. Next take the Poppy Parade card stock (1-1/4" Circle Punch) and place on the right side of the hamburger.
6. Next take the Crumb Cake top of the hamburger bun and place it on top of everything.
7. Take a Chocolate Chip Stampin' Write Marker and make dots on top of the hamburger bun.
8. Carefully adhere all of the pieces together.

Happy Stamping!
Michelle B
inspire. create. share.

Saturday, June 2, 2012

My Retired SU stamp set list

Hello Stamping Friends!
Today is June 2, 2012...which means I all of the Stampin' Up! products that I own and that have been retired are for sale!!!

Check it out here.  Remember it is a first come first serve basis.

Michelle's Retired SU products list

Happy Stamping!

Michelle B
Independent Stampin' Up! Demonstrator
inspire. create. share.

Wednesday, May 30, 2012

June Club Scrapbook Layout


Hello Stamping Friends!  I hope you are all enjoying the nice weather outside.  I have a stamping technique and scrapbook club coming up this Sunday and this is the Scrapbook Layout that we will be making.  The stamp set might look a little new to you - that is because it is!!!!  This is the Betsy's Blossom stamp set that is in the new 2012-2013 Stampin' Up! Catalogue.  I love the fresh new images that this catalogue has to offer.  You will be amazed when you get your hands on it, if you don't have a copy yet.

While I was looking on my computer for pictures, I noticed that I had lots of pictures that were taken outside of our yard and most of them had pictures of birds in them.  That is where the inspiration of this scarpbook theme came from.  The kids and I absolutely love feeding the birds and "Cyril the Squirrel".  We have so many great memories watching the wildlife that comes to visit us on a daily basis.  Some of these pictures date back as far as 2007.

If you love scrapbooking and need a good excuse to get some done, then you should join my scrapbook club next year.  We all have so much fun together visiting while doing something that we truly enjoy, perserving our most precious memmories.  Send me an email for further information.

Stampin' Up! Supplies used:
Stamp Set: Betsy's Blossoms (New 2012-2013 Stampin' Up! Catalogue)
Paper: 12" x 12" Lucky Limeade Textured card stock, Whisper White card stock, Early Espresso card stock, Neutrals Collection Patterns Designer Series paper Stack
Ink: Early Espresso Classic Stampin' Pad, Lucky Limeade Classic Stampin' Pad
Accessories: Scallop Trim Border Punch, Scallop Trim Corner Punch

Happy Stamping!
Michelle B
Independent Stampin' Up! Demonstrator
inspire. create. share.

Tuesday, May 22, 2012

Lunchbox Surprise

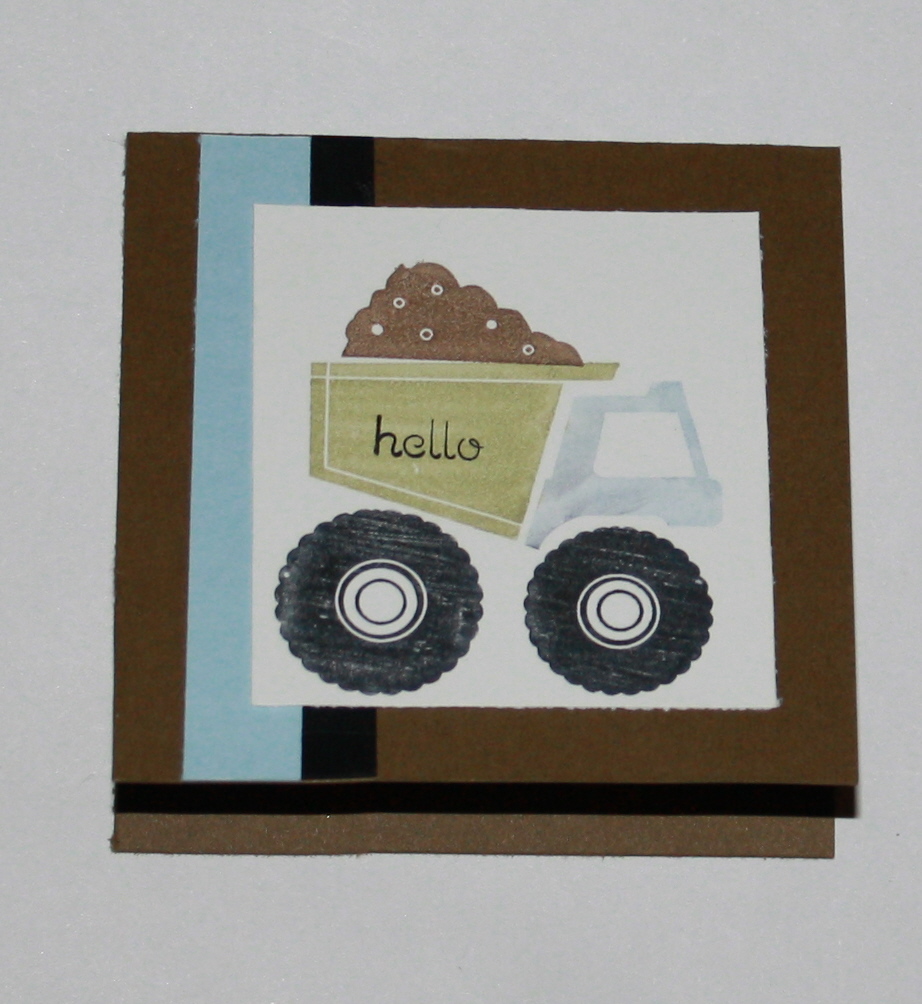
One of my fav things to do is make little notes and or cards and put them in my daughter's lunch box.  I started doing this last year when she was in kindergarten and have continued to do it.  I thought this was a special way to let her know that I am thinking of her and a creative way to help her with her reading.  Here are a couple of cards that I made for my kids last night and surprised them with today.  I put the pony card in my daughter's lunch box and gave my son his card after day care.  I think they really enjoyed getting these. 


Stampin Up! supplies used:

Pony Card                                                                     
Stamp Sets: Pony Party (Retiring), Teeny Tiny Wishes               
Paper: Whisper White card stock, Perfect Plum card stock,  Basic Black card stock                                                             
Ink: Jet Black Staz-On Ink, Wisteria Wonder Classic Stampin' Pad, Daffodil Delight Stampin' Write Marker, Basic Black Stampin' Write Marker                                                              
Accessories: Dazzling Details, Stamp-a-ma-jig       
                     
Dump Truck Card

Stamp Sets: I Dig You, Teeny Tiny Wishes
Paper: Soft Suede card stock, Bashflul Blue card stock, Basic Black card stock
Ink: Pear Pizzazz Stampin' Write Marker, Bashful Blue Stampin' Write Marker, Basic Black Stampin' Write Marker, Soft Suede Stampin' Write Marker
Accessories: Stampin' Dimensionals

Happy Stamping!
Michelle B
Independent Stampin' Up! Demonstrator
inspire. create. share.

Thursday, May 17, 2012

Frog on a Lily Pad punch art card


One of the things that I LOVE about Stampin' Up! punches is the many different way you can use them.  Just like this Frog on a Lily Pad card.  It was created using with a variety of Stampin' Up! punches.  See below for step by step instructions on how to create this too cute Frog on a Lily Pad card.

Step 1 - Cut a piece of Pool Party card stock in half length wise and fold in half.  This is your card base.

Step 2 - Cut a piece of Whisper White card stock 5" x 3-3/4"

Step 3 - Ink the Grass image from the Inspired By Nature stamp set (retiring at the end of May) with Pear
Pizzazz Classic Stampin' Pad (retiring at the end of May) and the stamped it on Whisper White card stock. You can repeat this step a couple of times until you have the amount of grass you want.

Step 4 - I used the following punches to create the Frog and Lily Pad:
Extra-Large Oval Punch for Frog's head (Pear Pizzazz card stock) and Lily Pad (Garden Green    c
card stock)
Large Oval Punch for Frog's legs (Pear Pizzazz card stock)
Owl Punch:  Bib for Frog's Arms (Pear Pizzazz card stock), Large Circles for Frog's Eyes (Whisper White card stock), Medium Circles for Black Pupils (Basic Black card stock)
3/4" Cicle Punch for Frog's Outer Part of Eyes (Pear Pizzazz card stock)
1 3/4" Circle Punch for Frog's body (Pear Pizzazz card stock)
1 3/8" Circle Punch for Frog's belly (Certainly Celery card stock)
Itty Bitty Punch 4 petal for Frog's hands and feet (Pear Pizzazz)

Step 5 - Cut a little triangle out of the Garden Green Lily Pad in the bottom right edge

Step 6 - Assemble Frog:
Adhere Frog's belly (Certainly Celery card stock) to Frog's body (Pear Pizzazz card stock) and flip over.
To adhere Frogs Legs place adhesive on either side of the back side of the Frog's body and position legs where you want them.  Place adhesive on the bottom part of the Frog's legs and adhere feet.  Next adhere Frog's Outer Part of Eyes to the back of the Frog's head.  Flip Frog's Head right side up and adhere to Frog's body.  Adhere White part of Eyes to each of the Center of the Frog's Outer Part of Eyes (it is okay if the White part goes over the Frog's Head a little bit), then adhere the Black Pupils in the center of the White part of the eye.  Lastly cut the Bib from the Owl Punch in half with scissors.  You can round one of the sides a bit so that they are flush with the small ends.  Adhere Frog's hands to each of the smaller ends.  Adhere Frog's Arms to the Frog's body.

Step 7 - Take a Basic Black Stampin' Write Marker and draw a smile on the Frog's Head and some lines on the Frog's legs.

Step 8 - Add embellishments and or a sentiment if you wish.

I hope you enjoyed this Frog Punch Art card as much as I did and take the time to make one yourself.  Have fun.

Happy Stamping!

Michelle B.
Independent Stampin' Up! Demonstrator
inspire. create. share.