Monday, December 28, 2009


Oh My!! I must really work on getting my uploads straight.  Here is February's 2010 Calendar page.

Stampin' Up! Supplies used:
Stamp sets: Full Calendar
Paper: Whisper White card stock, Rich Razzleberry card stock, Razzleberry Lemonade Designer Series Paper, Mambo Melon card stock
Ink: Rich Razzleberry Classic Ink
Accessories: Modern Label Punhc, 1/4" Whisper White Grosgrain Ribbon

Happy Stamping!
Michelle

Wednesday, December 23, 2009

January 2010 Calendar Page


For the last couple of years I have given handmade calendars to my family and friends.  Here is the page I did for January.  This calendar I will be giving to my Husband.  It has a bunch of 2009 pictures of our kids in it.  This are so quick and easy to make.  I think I made 5 in the last 5 days.  The only tough part was finding a place to bind them in time for Christmas.  The Staples Business Depot where I live couldn't give me a date before Christmas so I had to take them to one in Edmonton.  Then I found out that the UPS Store where I live also binds and they said they could do that for me and the turn around time was a couple of hours.  Woo Hoo!  These are great gifts for relatives that live out of town.  I made a calendar last year for my neighbour because her grandson lives in a different town than her. 

I haven't quite decided if I am going to add any stamping to the pages.  Hmmm I guess I better decide soon as Christmas Eve is tomorrow.  Yikes!  Not too sure if you can see it but I did some paper piercing along the picture in the Whisper White border.

Stampin' Up! Supplies used:
Stamp Sets: Full Calendar
Paper: Rich Razzleberry Textured card stock, Whisper White card stock, Pumpkin Pie card stock, Razzleberry Lemonade Designer Series Paper
Ink: Rich Razzleberry Classic Ink
Accessories:  Modern Label punch, Paper piercer, Mat Pack

Happy Stamping!
Michelle

Wednesday, December 16, 2009

Pattern Pines Old Olive Trio


This is another stamp set that when I saw it I knew I had to get it.  This stamp set is featured in the Hostess Benefits in the Holiday Mini Catalogue.  Isn't it cute!  You can do some much with these trees. I don't think you can see it but the trees are stamped in Craft Ink and embossed with Irridescent Ice Embossing Powder.

Stampin' Up! Supplies used:
Stamp Sets: Pattern Pines (Level 1 Hostess Benefits), Teeny Tiny Wishes
Card stock: Real Red, Certainly Celery, Old Olive, Bashful Blue, Whisper White, Crushed Curry
Ink: Old Olive Craft Ink, Chocolate Chip
Accessories:  Eyelet Border Punch, Star Punch, Certainly Celery 5/8" Grosgrain Ribbon, 2-Way Glue Pen, Dazzling Diamonds Glitter

Happy Stamping!
Michelle

Merry Christmas White Poinsettias


Here is another card that I made using the Berry Christmas stamp set feartured in the Holiday Mini.  While playing with it one night I thought I should try out white poinsettias.  This is what I came up with.  I struggled with this card as I had only put 3 white poinsettias on it and didn't know how to finish it.  This is the end result.  I really enjoy stamping with that set.

Stampin' Up! Supplies used:
Stamp Sets: Berry Christmas, Teeny Tiny Wishes
Card stock: Kraft, Real Red (or Red Riding Hood), Certainly Celery, Whisper White
Ink: Chocolate Chip Classic Ink, VersaMark
Accessories:  Big Shot, Top Note Bigz Die, White Embossing Powder, Gold Embossing Powder, Certainly Celery 5/8" Grosgrain Ribbon, Scallop Oval Punch, Crop-A-Dile

Happy Stamping!
Michelle

Make Merry! Berry Christmas Wreath and Poinsettia


Sorry that the picture is not all that straight.  I was getting cards ready for my Husband's work and realized I hadn't taken a picture of a few of the cards I had made.  The is one of them.  When I saw the Berry Christmas stamp set in the Holiday Mini catalogue I knew I had to get it.  It is such a fun set to use.  I always apply ink to the poinsettia stamp then stamp the image on paper and then turn the stamp 1/4" and stamp again.  That is how I got the two tone poinsettia in this card.  Very easy card to make.

Stampin' Up! Supplies used:
Stamp Set:  Berry Christmas (Holiday Mini Catalogue)
Card stock: Real Red, Whisper White, Certainly Celery
Ink: Real Red Classic Ink, Old Olive Classic Ink, Chocolate Chip Classic Ink, Certainly Celery Classic Ink
Accessories: Big Shot, Top Note Bigz Die

Happy Stamping!
Michelle

Tuesday, December 8, 2009

Clear-Mount Rubber Stamps by Stampin' Up!


I received my demonstrator copy of Stampin' Up!'s upcoming Occasions Mini Catalogue the other day and was totally impressed.  On page 6 & 7 is the above image.  Wow!  As of January 5, 2010 Stampin' Up! will also be carrying clear-mount rubber stamps.  Oh don't worry I have an order in for a few of those sets so that we can all try them out at my January Occasions stamp camp....date to be determined.  I was a little hesitant when I read this but if you look at the picture closely you can see that the stamp part is still the same rubber that we all love to use.....we just get to mount it on a clear block for easier placement.  Ohhhh I can't wait to receive my shipment.  Keep an eye on my blog to see upcoming cards made with Stampin' Up!'s newest product.........Clear-Mount Rubber Stamps!

Happy Stamping!
Michelle

Sunday, December 6, 2009

Happy Holidays from a singing Reindeer


Again I was trying to get ideas on what cards to make at my last Christmas card stamp camp using Stampin' Up! punches and I came across this cute little guy in Amy Watson's (arwatson) SCS Gallery.  A Singing reindeer card - oh my he it just too cute.  Thanks for the inspiration Amy.  Woo Hooo! Card design #5 done for my last Christmas card stamp camp.

Stampin' Up! supplies used:
Stamp set:  Four the Holidays
Card stock: Very Vanilla, Garden Green, Merry Moments Designer Serie Paper, Close to Cocoa, Basic Black, Chocolate Chip
Ink: Chocolate Chip, Basic Black Stampin' Write Marker
Accessories:  Big Shot, Top Note Bigz Die, Swirls Scribbles Sizzlits Die, Wide Oval punch, Small Oval punch, Word Window Punch, Real Red 1/4" Grosgrain Ribbon, Uni-Ball Signo White Gel Pen, One-Hole Punch

Happy Stamping!
Michelle

Season's Greeting Penguin and Fish card


This is my Punch Art card design #4 that is being featured at my last Christmas card stamp camp on December 13 using Stampin' Up! punches.  It is amazing what you can do with a punch.  I have two different ladies to thank for inspiring me on this one.  I found a penguin and fish card on SCS under Rochelle Gould's gallery as well as on Andrea Walford's blog, Sunny Stampin' Inc.  This is the card I came up with from their inspiration.  Thanks ladies!

Stampin' Up! supplies used:
Stamp set:  Snow Swirled
Card stock:  Basic Gray, Bashful Blue, Whisper White, Basic Black, Only Orange, Silver
Ink: Basic Gray
Accessories:  Wide Oval punch, Scallop Oval punch, Heart to Heart punch, 5-Petal Flower punch, Jumbo Snowflake punch, Modern Label punch, One-Hole punch, Circle Ice Rhinestone Brads, Snowfall Printed Window Sheet, Scallop Edge punch

Happy stamping!
Michelle

Saturday, December 5, 2009

Merry Christmas Gingerbread Man


My friends Heidi & Wendy asked me at my last Christmas card stamp camp in November if we could do our next Christmas card stamp camp using punch art.  They showed me this very cute Gingerbread man card found in Amy Watson's SCS Gallery.  Thanks for the inspiration Amy!  So after seeing Amy's card I thought that card is too cute. This is card design #1 that we will be making at my last Christmas card stamp camp in December.   He is too cute and ever so easy to make.  I made a Petals-A-Plenty Border with an oval center on this card.  It might be hard to see.  I put an oval in a piece of Stampin' Up! chipboard and then whenever an textured impressions folder is used the oval remains untouched.  It leave a really nice touch to a card.

Stampin' Up! Supplies used:
Stamp Sets: All Holidays
Card stock: Chocolate Chip, Very Vanilla, Close to Cocoa
Ink: VersaMark
Accessories: 1-3/8" Circle Punch, Small Tag Punch, Word Window Punch, Heart to Heart Punch, Gold Embossing Powder, Uni-ball Signo White Gel Pen, Petals-A-Plenty Textured Impressions Folder, Big Shot, Oval Template made out of Stampin' Up! Chipboard, 3/4" Real Red Polka-Dot Grosgrain Ribbon, Kraft Taffeta Ribbon

Happy Stamping!
Michelle

Snowman Season's Greetings


For my last Christmas card stamp camp which is on December 13 we will be making 5 different card designs.  I had a request that we use some of Stampin' Up!'s punches.  Well how can I pass on one of my favourite Stampin' Up! products.  Ohhh I love their punches.  Here is card design #2.  A while ago I saw a video tutorial on Andrea Walford's blog using a top note stencil.  I thought that was a great idea so I made one myself.  All you have to do is take a piece of Stampin' Up!'s window sheet and their Top Note Bigz Die...you run the window sheet through the Big Shot just like a piece of card stock and voila you have a top note stencil.  :)  That is how I made the top note outline shown on the card.  I am not sure if you can see it but the snowflakes around the snowman are stamped with Stampin' Up!'s Platinum Shimmer Paint.  Thanks Andrea for the inspiration you gave me to make this card.  I also found a neat 'naughty snowmen' card on Andrea's blog too.  I thought that was such a neat idea using the Jumbo Snowflake punch for the snowman's arms.  Very clever.

Stampin' Up! Supplies used:
Stamp Sets:  Many Merry Messages, Serene Snowflakes
Card stock: Whisper White, Chocolate Chip, Real Red, Only Orange, Basic Black
Ink: Not Quite Navy, Tempting Turquoise
Accessories:  1-3/4" Circle Punch, 1-3/8" Circle Punch, 1/2" Circle Punch, Jumbo Snowflake Punch, Big Shot, Top Note Bigz Die Stencil, Sponge Dauber, Silver Elastic Cord, Platinum Shimmer Paint, Sponge, Uni-ball Signo White Gel Pen

Happy Stamping!
Michelle

Tuesday, December 1, 2009

Another Upsy Daisy Birthday Card


Another birthday card that I came up with yesterday.  Yesterday was really a good stamping day.  I usually make two of each card I make but yesterday I thought why not make 6.  hehehehe!

Stampin' Up! Supplies used:
Stamp Sets:  Upsy Daisy, Teeny Tiny Wishes
Card stock:  Basic Gray, Whisper White, Silver, Melon Mambo
Ink: Basic Gray, VersaMark
Accessories: Scallop Edge Punch, Modern Label Punch, Crop-A-Dile, Silver Brads, Stampin' Dimensionals, White Embossing Powder, Melon Mambo 1/2" Polka-Dot Grosgrain Ribbon

Happy Stamping!
Michelle

Baroque Motif Happy Birthday


One the weekend I noticed that there are 4 birthdays that I needed to send out cards for and I went to look in my card stash and I had no birthday cards in there.  Yikes!  Yesterday I manage to make 6 cards and made 4 of those cards birthday ones.  Yeah!  I got the cards on yesterday as well.  I think they will all be late getting to where they need to go.  Ops!  I had a lot of fun with this color combo (Basic Gray, Silver, Whisper White and Pretty in Pink).

Stampin' Up! Supplies used:
Stamp Sets: Baroque Motifs, Teeny Tiny Wishes
Card stock: Basic Gray, Silver, Whisper White and Pretty in Pink
Ink: Basic Gray, VersaMark
Accessories: Modern Label Punch (my new fav), Crop-A-Dile, Scallop Edge Punch, Silver Brads, White Embossing Powder, Pretty in Pink 1/2" Striped Grosgrain Ribbon

Happy Stamping!
Michelle

Wednesday, November 25, 2009

Welcome Little One Baby Girl card


Here is the baby girl version of the baby boy card I made.

Stampin' Up! Supplies used:

Stamp Sets: Nursery Neccessities, See You Around Jumbo wheel
Card Stock: Kraft, Pretty In Pink, Chocolate Chip, Whisper White
Ink: Chocolate Chip Classic Ink, Pretty In Pink Stampin' Write Marker, Apricot Appeal Stampin' Write Marker
Accessories: Scallop Edge Punch (one of my favs!), Chocolate Chip 1/4" Grograin Ribbon

Tuesday, November 24, 2009

Welcome, Little One Baby Boy card


Ohh I just love making baby cards.  A new baby brings so much joy. 

Stampin' Up! Supplies used:
Stamp Sets:  Nursery Neccessities, See You Around Jumbo wheel
Card Stock: Kraft, Bashful Blue, Chocolate Chip, Whisper White
Ink: Chocolate Chip Classic Ink, Bashful Blue Stampin' Write Marker, Mellow Moss Stampin' Write Marker
Accessories:  Scallop Edge Punch (one of my favs!), Chocolate Chip 1/4" Grograin Ribbon

Our Christmas Tree Scrapbook page

Page 1


Page 2
I thought I should add some scrapbook pages to my blog.  Well here is my first uploaded scrapbook page.  This two page layout was the last scrapbook layout we did for my 2009 Stampin' Technique and Scrapbook Club.  In next year's Stampin' Technique and Scrapbook club we will be creating a scrapbook layout each month.  Ohhhh very exciting.  We will definetly get a long accomplished.

Stampin' Up! Supplies used:
Stamp Sets: Pattern Pines (Holiday Mini Hostess Level 1)
Card Stock: Old Olive, Real Red, Very Vanilla
Ink: Old Olive Classic Ink, Real Red Classic Ink
Accessories: Eyelet Border Punch, Stamping Dimensionals, Kiwi Kiss 5/8" Striped Grograin Ribbon, Big Shot Die Cutting Machine, Naturally Serif Sizzlits Decorative Strip Dies

Tuesday, November 17, 2009

Merry Christmas Holly


This is by far one of my favourite stamp sets.....A Cardinal Christmas.  I just love this Christmas Holly.  The ribbon might be a bit out of place - I should change but other than that I really like this card.  I saw this technique on Splitcoast Stampers using the Big Shot along with the Petals-A-Plenty Textured Impressions Folder and an oval template.  I made my oval template from a piece of chipboard I had.  It worked like a charm.  Some stampers cut their Petals-A-Plenty Textured Impressions Folder to get the same effect.  I was a bit leery in doing that.  So yippeee that I was able to do the same thing with chipboard.

Stampin' Up! Supplies used:
Stamp Sets: A Cardinal Christmas
Card stock: Kraft, Real Red, Very Vanilla
Ink: Chocolate Chip Stampin' Write Marker, Garden Green Stampin' Write Marker, Real Red Stampin' Write Marker, VersaMark
Accessories:  Big Shot, Petals-A-Plenty Textured Impressions Folder, Oval Template made out of chipboard, Sleigh Bells 5/8" Cotton Ribbon, Modern Label Punch, Gold Embossing Powder

Happy Stamping!

Elfie on a Pocket Card


Here is another card I made using Stampin' Up!'s Ornament punch and the very easy instructions on Andrea Walford's Sunny Stampin' Inc. website.  Andrea is one very talented lady.

I know every card I make these days has to do with Christmas.  I am trying to get a good head start as I usually need to make around the 100 mark.  I should count and see just how many I have.  I am hoping that I have made a bit of a dent.

Elfie on a pocket card is just too cute.  The step by step instructions on how to make Elfie are in an earlier post I did the other day.

Stampin' Up! Supplies used:
Stamp Sets: A Cardinal Christmas
Card Stock: Real Red, Old Olive, Whisper White, Blush Blossom, Night of Navy, Christmas Cocoa Specialty Designer Series Paper
Ink: Chocolate Chip, Creamy Caramel
Accessories:  Whisper White 1/4" Grosgrain Ribbon, Wide Oval Punch, Modern Lable Punch, Scallop Edge Punch, Ornament Punch, Trio Flower Punch, Pom-Pom, Stampin' Dimensionals, Gold Brads

Happy Stamping!

Monday, November 16, 2009

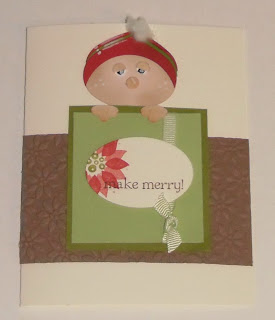
Make Merry with Elfie!


Here is my other card using this darling little Elf punched out of Stampin' Up!'s Ornament Punch.  I am sure I will make a bunch more cards using Elfie as he is too cute.

Happy Holidays with Elfie


The other night I was on Splitcoaststampers and I came across this cute little elf.  He is made using punched out of card stock and Stampin' Up!'s Ornament Punch.  Wow! How cool is that!  I found this elf  in Momof2Shihtzus (Mary) SCS gallery.  I then found him again on Andrea Walford's Sunny Stampin' Inc. website, complete with video tutorial.  Woo Hoo!  Thanks Mary and Andrea for the inspiration!  This is the card I came up with.  He is so cute and very easy to make.

Instructions to make Elfie:
The punched out items you will need
- Using the Ornament Punch punch out an ornament in Real Red and Blush Blossom.
- Using the punch again punch out the bottom half of the ornament in Real Red and Old Olive.
- Next take your one-hole punch and punch out 3 Blush Blossom circles and 2 Whisper White circles
- Next you will need 2 Basic Black circles for the eyes, I used my small hole punch on my Crop-A-Dile.
- Next punch out 2 flowers from the Trio Flower Punch
Putting Elfie Together
- Take the Ornament punched out in Real Red card stock with the point pointing up and position your 1 3/4" Circle Punch about a little over half way up and punch.  This is the top of Elfie's hat.
- Grab a sponge dauber and the Blush Blossom Ornament piece and apply a small amount of Creamy Caramel Classic Ink around the edge of the ornament.  This is Elfie's face.
- Next position the top of Elfie's hat over top of the Blush Blossom Ornament piece, again with the points pointing up and adhere.
- Next take the Old Olive half Ornament piece and position it behind the Real Red top of Elfie's hat.  Once you have it in the correct position flip them over and mark where the bottom of the Old Olive half Ornament piece ends with a pencil.  This is to avoid getting glue in placing where we don't want it.  Next adhere Old Olive half Ornament piece to the back.
- You will be doing the same step with the Real Red half Ornament piece.
- Now it is time to do his eyes.  You can apply with a sponge dauber again Creamy Caramel Classic Ink to his eye lids and nose.  Once you have that finished, you are going to cut 2 of the Blush Blossom Circles just below the half way mark please keep the bigger part of the half circles - these are Elfie's eye lids.
- Next take the small black circles and adhere them to the lower part of the Whisper White circles.  Once the glue has dried, adhere the eye lids over top of the eyes.
- Next adhere the eyes to Elfie's face just below the bottom part of his hat.
- Next adhere Elfie's nose.
- Again using the sponge dauber and Creamy Caramel Classic Ink, rub 3 of the petals on the 2 Flowers we punched out from the Trio Flower Punch.  These are his fingers (yes 3 fingers).  We are going to cut a round part to finish off the hand.
- Now all you need to do is make a Chirstmas Wish sign or a present for Elfie and his hands to be behind.

Stampin' Up! Supplies used:
Stamp sets: Four the Holidays
Card stock: Very Vanilla, Blush Blossom, Whisper White, Basic Black, Old Olive, Certainly Celery, Real Red
Ink: Chocolate Chip Classic Ink, Creamy Caramel Classic Ink, Bravo Burgandy Classic Ink, Garden Green Classic Ink
Accessories: Big Shot Die Cutting Machine, Petals-A-Plenty Textured Impressions, Real Red 1/4" Grosgrain Ribbon, Scallop Edge Punch, Ornament Punch, Crop-A-Dile, Trio Flower Punch, One-Hole Punch, Mini Glue Dots, Uniball Signo White Gel Pen, White Pom-pom

Happy Stamping!
Michelle

Monday, November 9, 2009

Merry Christmas Vintage Ornaments


This is just how bad the Stamping Bug has bitten me.....when I saw a card similar to this on the Stampin' Up! Demonstrator Website and I knew I had to re-create it.  So I brought out my Idea Book & Catalogue along with the Definitely Decorative Home Decore Elements Brochure and wrote down the supplies I needed to get.  That is right you read that right.....Definitely Decorative Home Decor Elements Brochure..........this card is made with the Vintage Ornaments #1 and #2 STENCILS found on page 29.  Yup...amazing isn't it.  This will be a second extra card featured at my November Christmas card stamp camp.

Stampin' Up! Supplies used:
Stamp sets: Teeny Tiny Wishes
Card stock: Very Vanilla, Soft Suede
Ink: Rich Razzleberry Classic Ink, Soft Suede Classic Ink, Bermuda Bay Classic Ink, Whisper White Craft Ink
Accessories: Vintage Ornaments 1 Stencils, Vintage Ornaments II Stencils, Silver Encore Re-Inker, Spong Dauber, Stampin' Dimensionals, Crop-A-Dile, Clear Circle Rhinestone Brads

Merry Christmas Dasher


This stamp set has quickly become another Christmas fav to use.  This card will be featured at my November Christmas card stamp camp as an extra.  Those who finish quickly if they want to keep on stamping then they can with this card.

Stampin' Up! supplies used:
Stamp sets: Dasher, Teeny Tiny Messages
Card stock: Very Vanilla, Close to Cocoa, Chocolate Chip, Real Red
Ink: Chocolate Chip Classic Ink
Accessories: Big Shot Die Cut Machine, Petals-O-Plenty Textured Impressions Folder, Scallop Edge Punch, Sleigh Bells 5/8" Cotton Ribbon, Modern Label Punch, Stampin' Dimensionals

Saturday, November 7, 2009

Season's Greetings Silver & Soft Suede Snowflakes


Hahaha I had fun playing with Stampin' Up!'s new Silver Shimmer Paint.  This is the second card that we will be creating at my November 21st Christmas card stamp camp.  We will be making 5 of this design along with matching envelopes.  I am very excited to show the card stampers how to create this fun Christmas card.  Snowflake cards are one of my favourites to make.

Stampin' Up!' supplies used:
Stamp Sets: Serene Snowflakes, Four the Holidays (both stamp sets are featured in Stampin' Up!'s 2009 Holiday Mini Catalogue)
Card stock: Soft Suede, Very Vanilla
Paper:  Christmas Cocoa Specialty Designer Series Paper
Ink: Soft Suede Classic Ink
Accessories: Scallop Edge Punch, Stampin' Dimensionals, Silver Shimmer Paint, Sponge Dauber

Peace on Earth Silver Shimmer Paint Snowflake


Ohhhh Stampin' Up!'s new Silver Shimmer Paint is so much fun to use.  It makes for a very pretty addition to a Christmas card.  This is one of the cards that will be featured at my November 21st Christmas card stamp camp.  We will be making 5 of this design along with matching envelopes.  I think stamping the envelopes is part of the fun too.

Stampin' Up! supplies used:
Stamp Sets:  Serene Snowflakes, Four the Holidays (both stamp sets are featured in Stampin' Up!'s 2009 Holiday Mini Catalogue)
Card stock: Whisper White, Bashful Blue, Night of Navy
Ink: Night of Navy Classic Ink
Accessories: Scallop Edge Punch, Whisper White 1/4" Grosgrain Ribbon, Silver Shimmer Paint, Spong Dauber, Crop-A-Dile, Clear Circle Rhinestone Brad, Stampin' Dimensionals

Tuesday, November 3, 2009

Fairytale Home Decor Elements by Stampin' Up!


Here is a picture of my daugther's room.  Now this was a fun project that we did together.  Stampin' Up! Home Decor Elements are so much fun and very easy to use.

Monday, November 2, 2009

Stampin' Up!'s Holiday Extravaganza

Stampin' Up! has a really great Holiday gift guide for those crafty people on your list.....they have suggestions for children, teens, card makers, scrapbookers, etc.  Please make sure to check out my Stampin' Up! Demonstrator website to find this gift giving list.

Cheers!

Sunday, November 1, 2009

Pattern Pines in a Snow Globe card


When I saw the snow globe card on the back of Stampin' Up!'s Holiday Mini catalogue I knew I had to make one.  These cards have quickly become one of my favourite card types to make.  So easy to make.  We made this card at our October Stampin' Technique & Scrapbook club - our last club get together of the year.

Stampin' Up! Supplies used:
Stamp Sets: Pattern Pines (Level 1 Hostess - Holiday Mini), All Holidays
Card stock: Bashful Blue, Kraft, Whisper White
Ink: VersaMark, Old Olive Classic Ink, Chocolate Chip Classic Ink, More Mustard Classic Ink
Accessories: Clear Embossing Powder, Crop-A-Dile, Blue Circle Rhinestone Brad, 3/4" Real Red Polka-Dot Grosgrain Ribbon

Saturday, October 31, 2009

Polar Among the Pines


Every time I see this bear from the "Under the Stars" stamp set my mind goes crazy with ideas to use him. I have yet to add him to my stamp set collection but good friends of mine, Heidi & Wendy, lent him to me for the week. This was my thank you card to them for loaning him to me. I had the idea of making him into a polar bear for a Christmas or winter scene card and this is what I came up with.

Stampin' Up! supplies used:
Stamp Set: Under the Stars, Patterned Pines (Level 1 Holiday Mini)
Card stock: Bashful Blue, Real Red, Whisper White, Very Vanilla, Crushed Curry
Ink: Chocolate Chip Classic Ink, Old Olive Craft Ink, Creamy Caramel Stampin' Write Marker
Accessories: Circle Cutter, Glass Matt, 2-Way Glue Pen, Dazzling Diamonds Glitter, Little Star Punch, Stampin' Dimensionals

FRANKENSTEIN


When I saw this card all over SCS and Stampin' Up!'s Demonstrator Website I knew I just had to CASE it. This Frankenstein is adorable and so much fun to make.

Stampin Up! Supplies used:
Stamp Set: Teeny Tiny Messages
Card stock - Only Orange, Basic Black, Lovely Lilac, Green Gable, Whisper White, Basic Gray
Ink: Basic Black Classic Ink, Basic Black Stampin' Write Marker
Accessories: Big Shot, Top Note Bigz Die, 1 3/4" Circl Punch, 1 1/4" Circle Punch, Round Tab Punch, Word Window Punch, Signo Uni-ball White Gel Pen